webpack入门(webpak4)
webpack 基础知识
需要用到的包介绍
- webpack - webpack 的核心包
- webpack-cli - webpack 的命令行工具
- webpack-dev-server - webpack 的开发服务器 (热更新)
webpack-cil 命令参考
https://webpack.js.org/api/cli/
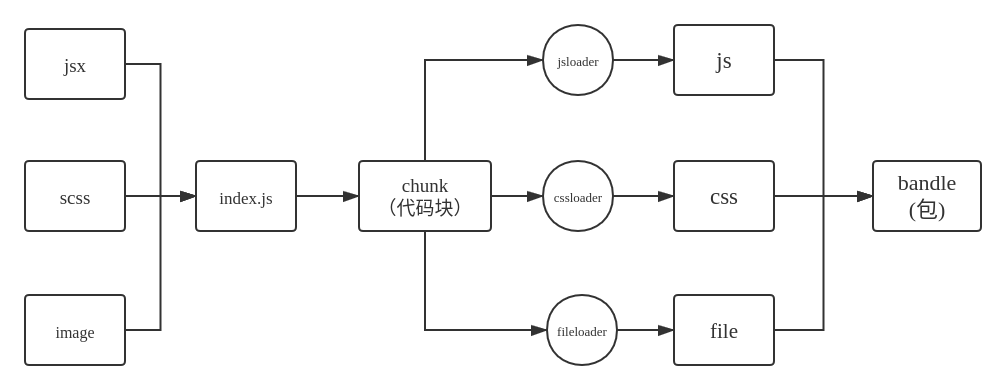
webpack 的打包过程
webpack 初体验
- webpack 将 ES6 的模块化编译成浏览器能够识别的模块化
- webpack 默认只能打包 js 和 json 文件
- 生产环境和开发环境的区别 ,开发环境是经过压缩的代码
使用命令行设置打包入口出口和 mode
webpack --entry  ./src/index.js -o ./dist --mode=development #开发模式

webpack --entry  ./src/index.js -o ./dist --mode=production #生产模式
webpack.config.js
指示 webpack 来干那些活 当运行 webpack 指令时 会加载里面的配置
打包样式资源
下载插件
npm i css-loader style-loader less-loader less -D
修改配置
普通 css 文件
// webpack.config.js
const { resolve } = require("path");
module.exports = {
  //入口
  entry: "./src/index.js",
  //出口
  output: {
    filename: "bundle.js",
    path: resolve(__dirname, "dist"),
  },
  //模式 development 、 production
  mode: "development",
  // loader
  module: {
    rules: [
      {
        test: /\.css$/,
        // 执行顺序由右到左
        use: ["style-loader", "css-loader"],
      },
    ],
  },
  // plugins 插件 (数组)
  plugins: [],
};
//index.js 中引入样式 webpack 会通过import加载css 再通过 css-loader ->style-loader 转换为style标签放在head中
import "./index.css";
引入 less 或 sass 样式处理文件
// rules 中 添加 less  或 sass 的处理规则
{
    test:/\.less$/,
    use:[
      //转化为style
      "style-loader",
      // 处理css
      "css-loader",
      // 转化为css
      "less-loader"
    ]
 }
注意事项
less 和 sass 不光要下对应的 loader 还需要 less 或 sass 包
ps:node-sass 安装起来比较麻烦 可以参照 https://www.cnblogs.com/zhishaofei/p/12712937.html
打包 HTML 资源
下载插件
npm install --save-dev html-webpack-plugin
tip: html-webpack-plugin 和 html-loader 的不同
- html-loader 是用来解析入口文件中关联的 html 中的 image 图片的引入
- html-webpack-plugin 是用来自动生成最后 dist 目录下的 index.html (并自动导入打包好的 js)
html-webpack-plugin 插件的更多配置见官网 :https://github.com/jantimon/html-webpack-plugin
修改配置
// webpack.config.js
const { resolve } = require("path");
const HtmlWebpackPlugin = require("html-webpack-plugin");
module.exports = {
  entry: "./src/index.js",
  output: {
    filename: "bundle.js",
    path: resolve(__dirname, "dist"),
  },
  mode: "development",
  module: {
    rules: [],
  },
  plugins: [
    // HtmlWebpackPlugin 会自动在output目录下生成index.html
    // 并自动引入打包好的 bundle.js
    new HtmlWebpackPlugin({
      // 以./src/index.html 为模板 生成最后打包好的html
      template: "./src/index.html",
    }),
  ],
};
打包图片资源
下载插件
npm install --save-dev html-loader url-loader file-loader
修改配置
const { resolve } = require("path");
const HtmlWebpackPlugin = require("html-webpack-plugin");

module.exports = {
  entry: "./src/index.js",
  output: {
    filename: "bunle.js",
    path: resolve(__dirname, "dist"),
    publicPath: "", // webpack5 中html中导入image需要设置publicPath (升级html-webpack-plugin 到 5.xx可以不用)
  },
  mode: "development",
  module: {
    rules: [
      {
        test: /\.less$/,
        use: ["style-loader", "css-loader", "less-loader"],
      },
      // 解析图标 将小图标直接转base64 url-loader 依赖 file-loader 需要一起下载
      {
        test: /\.(jpg|png|gif)$/,
        use: [
          {
            loader: "url-loader",
            options: {
              // 小于8kb的以base64位插入 data:image/jpeg;base64,/9j
              // 大于8kb的以改为hash值为名称的原文件插入
              limit: 8 * 1024,
              esModule: false,
            },
          },
        ],
      },
      {
        // 处理html文件的img图片(负责引入img,从而能被url-loader进行处理)
        test: /\.html$/,
        use: "html-loader",
      },
    ],
  },
  plugins: [
    new HtmlWebpackPlugin({
      template: "./index.html",
    }),
  ],
};
打包其他资源(字体等)
修改配置
  {
    // 处理其他资源
    exclude: /\.(html|js|css|less|jpg|png|gif)/,
    loader: 'file-loader',
    options: {
      name: '[hash:10].[ext]',
      outputPath: 'font'
    }
  }
devServer
下载插件
npm i webpack-dev-server -D
修改配置
webpack.config.js 中添加
// 开发服务器 devServer:用来自动化(自动编译,自动打开浏览器,自动刷新浏览器~~)
// 特点:只会在内存中编译打包,不会有任何输出
devServer: {
    // 项目构建后路径
    contentBase: resolve(__dirname, 'build'),
    // 启动gzip压缩
    compress: true,
    // 端口号
    port: 3000,
    // 自动打开浏览器
    open: true
  }
webpack 5
  devServer: {
    // 告诉服务器从哪个目录中提供内容。只有在你想要提供静态文件时才需要。。
    static: {
      directory: path.join(__dirname, "public"),
    },
    // 压缩
    compress: false,
    port: 9000,
    hot: true,
    devMiddleware: {
      // 虚拟路径 devServer.publicPath 将用于确定应该从哪里提供 bundle,并且此选项优先
      publicPath: "/public/",
    },
  },
调用服务使用命令
如全局安装 wabpack 直接: webpack serve
没有全局安装 webpack :npx webpack serve
启动服务后不会生成固定文件 devserver 会在内存中进行编译
使用 express 作为开发服务器配置
https://webpack.docschina.org/guides/development/#using-webpack-dev-middleware
提取 css 文件为单独资源
用上面的方法打包出来的 css 都在 js 文件中 感觉加载时会闪一下 所以单独提炼出 css (使用 link 标签)
下载插件
npm install --save-dev mini-css-extract-plugin
修改配置
 module: {
    rules: [
      {
        test: /\.css$/,
        use: [
          // 这个loader取代style-loader。作用:提取js中的css成单独文件
          MiniCssExtractPlugin.loader,
          "css-loader"
        ]
      }
    ]
  },
  plugins: [
    new HtmlWebpackPlugin({
      template: "./src/index.html"
    }),
    // 对输出的css文件进行重命名
    new MiniCssExtractPlugin({
      filename: "css/index.css"
    }),
  ]
css 兼容性处理
基于:postcss
postcss 相当于一个启动器,里面可以装各种 插件 如 postcss-preset-env(预设环境) 和 autoprefixer(自动前缀)
下载插件
npm install --save-dev postcss-loader postcss-preset-env
- postcss-loader :
在所有 css | sass | less loader 前使用 作用: 使用 postcss 来解析 css
- postcss-preset-env :
帮你将最新的 CSS 语法转换成大多数浏览器都能理解的语法,并根据你的目标浏览器或运行时环境来确定你需要的 polyfillss (postcss-preset-env 为 postcss 的 预设环境)
修改配置
rules: [
  {
    test: /\.css$/,
    use: [
      MiniCssExtractPlugin.loader,
      "css-loader",
      /*
            css兼容性处理:postcss --> postcss-loader -postcsspreset-env

            帮postcss找到package.json中browserslist里面的配置,通过配置加载指定的css兼容性样式

            "browserslist": {
              // 开发环境 --> 设置node环境变量:process.env.NODE_ENV = development
              "development": [
                "last 1 chrome version",
                "last 1 firefox version",
                "last 1 safari version"
              ],
              // 生产环境:默认是看生产环境
              "production": [
                ">0.2%",
                "not dead",
                "not op_mini all"
              ]
            }
          */
      // 使用loader的默认配置
      // 'postcss-loader',
      // 修改loader的配置
      {
        loader: "postcss-loader",
        options: {
          postcssOptions: {
            plugins: [
              [
                "postcss-preset-env",
                {
                  // Options
                },
              ],
              // 或者 require("postcss-preset-env")()
            ],
          },
        },
      },
    ],
  },
];
browserslist
具体配置说明 https://github.com/browserslist/browserslist
在 package.json 中配置 browserslist 或添加 .browserslistrc 文件
具体的环境是根据 process.env.NODE_ENV 确定, 所以需要设置 process.env.NODE_ENV ,只设置 mode: 'production' 不好使
"browserslist": {
    "development": [
      "last 1 chrome version",//兼容最近的谷歌浏览器
      "last 1 firefox version",
      "last 1 safari version"
    ],
    "production": [
      ">0.01%",//兼容>0.01%
      "not dead",//不用管弃用的浏览器
      "not op_mini all"//不用op
    ]
  }
压缩 css
webpack v4 使用 optimize-css-assets-webpack-plugin
对于 webpack v5 或更高版本,请改用 css-minimizer-webpack-plugin。
下载插件
npm install --save-dev css-minimizer-webpack-plugin
修改配置
const CssMinimizerPlugin = require('css-minimizer-webpack-plugin');

module :...,
plugins:...,
optimization: {
    minimize: true,
    minimizer: [
      // For webpack@5 you can use the `...` syntax to extend existing minimizers (i.e. `terser-webpack-plugin`), uncomment the next line
      // `...`,
      new CssMinimizerPlugin(),
    ],
  },
js 语法检查
下载插件
npm install --save-dev eslint-loader eslint eslint-config-airbnb-base eslint-plugin-import
eslint-loader 已经弃用 请使用 eslint-webpack-plugin
eslint-config-airbnb-base :airbnb 标准的所以规则 需要
eslint和eslint-plugin-import。
npm install --save-dev eslint-webpack-plugin
修改配置
eslint-loader (已经弃用)
...
  module: {
    rules: [
      /*
        语法检查: eslint-loader  eslint
          注意:只检查自己写的源代码,第三方的库是不用检查的
          设置检查规则:
            package.json中eslintConfig中设置~
              "eslintConfig": {
                "extends": "airbnb-base"
              }
            airbnb --> eslint-config-airbnb-base  eslint-plugin-import eslint
      */
      {
        test: /\.js$/,
        exclude: /node_modules/,
        loader: 'eslint-loader',
        options: {
          // 自动修复eslint的错误
          fix: true
        }
      }
    ]
  },
eslint-webpack-plugin
const ESLintPlugin = require("eslint-webpack-plugin");

module.exports = {
  // ...
  plugins: [new ESLintPlugin(options)],
  // ...
};
eslint 的配置
在 package.json 中的"eslintConfig" 或者 .eslintrc.js 中修改 eslint 的配置
  extends: "airbnb-base",
  env: {
    browser: true
  },
  rules: {
    "no-console": process.env.NODE_ENV === "development" ? "off" : "warn"
  }
eslint 全配置:https://eslint.bootcss.com/docs/user-guide/configuring#extending-configuration-files
js 兼容性处理
下载插件
npm install --save-dev babel babel-loader @babel/core @babel/preset-env @babel/polyfill core-js
@babel/preset-env babel 预设环境
@babel/polyfill 所有的转换包集合 Babel 7.4.0 开始,不赞成使用此软件包
core-js 是 babel-polyfill 的底层依赖 可以配合 useBuiltIns 选项实现按需加载
修改配置
有两种方式配置 babel
- 在 webpack.config.js 中配置
- 在 babel.config.js 中配置
在 webpack.config.js 中配置
...
  module: {
    rules: [
      {
        test: /\.js$/,
        exclude: /node_modules/,
        loader: 'babel-loader',
        options: {
          rootMode: "upward",
        },
        options: {
          // 预设:指示babel做怎么样的兼容性处理
          presets: [
            [
              '@babel/preset-env',
              {
                // 按需加载
                useBuiltIns: 'usage',
                // 指定core-js版本
                corejs: {
                  version: 3
                },
                // 指定兼容性做到哪个版本浏览器
                targets: {
                  chrome: '60',
                  firefox: '60',
                  ie: '9',
                  safari: '10',
                  edge: '17'
                }
              }
            ]
          ]
        }
      }
    ]
  },
在 babel.config.js 中配置
或者将配置放到项目根目录的 babel.config.js
  module: {
    rules: [
      {
        test: /\.js$/,
        exclude: /node_modules/,
        loader: 'babel-loader',
        options: {
          rootMode: "upward",  // 需要配置 rootMode: "upward" 意思是向上查找 找到 babel.config.[json | js]
        },
      }
    ]
  },
babel.config.js
module.exports = {
  // 预设:指示 babel 做怎么样的兼容性处理
  presets: [
    [
      "@babel/preset-env",
      {
        // 按需加载
        useBuiltIns: "usage",
        // 指定core-js版本
        corejs: {
          version: 3,
        },
        // 指定兼容性做到哪个版本浏览器
        targets: {
          chrome: "60",
          firefox: "60",
          ie: "9",
          safari: "10",
          edge: "17",
        },
      },
    ],
  ],
};
js 压缩和 html 压缩
修改配置
...
// 生产环境下会自动压缩js代码 和 html代码
mode: 'production'
也可以自定义压缩配置
plugins: [
  new HtmlWebpackPlugin({
    template: "./src/index.html",
    // 当webpack的默认mode值为'production' 自动设置 minify: true
    // 全部配置查看:https://www.npmjs.com/package/html-webpack-plugin#minification
    // 压缩html代码
    minify: {
      // 移除空格
      collapseWhitespace: true,
      // 移除注释
      removeComments: true,
    },
  }),
];
webpack 性能优化
- 开发环境性能优化
- 生产环境性能优化
开发环境性能优化
- 优化打包构建速度
- HMR
- 优化代码调试
- source-map
生产环境性能优化
- 优化打包构建速度
- oneOf
- babel 缓存
- 多进程打包
- externals
- dll
- 优化代码运行的性能
- 缓存(hash-chunkhash-contenthash)
- tree shaking
- code split
- 懒加载/预加载
- pwa
HMR
tip
webpack 5 需要使用 npm i webpack-dev-server@4.0.0-beta.0
但是目前 4.0.0-beta.0 还不完善 文档没有更新 热模块重载不好使
定义
hot module replacement 热模块替换 / 模块热替换
作用
一个模块发生变化,只会重新打包这一个模块(而不是打包所有模块) 极大提升构建速度
样式文件:可以使用 HMR 功能:因为 style-loader 内部实现了~
- js 文件:默认不能使用 HMR 功能 --> 需要修改 js 代码,添加支持 HMR 功能的代码 注意:HMR 功能对 js 的处理,只能处理非入口 js 文件的其他文件。
- html 文件: 默认不能使用 HMR 功能.同时会导致问题:html 文件不能热更新了~ (不用做 HMR 功能) 解决:修改 entry 入口,将 html 文件引入
各大框架的 loader 内部支持了 HMR
- React Hot Loader: 实时调整 react 组件。
- Vue Loader: 此 loader 支持 vue 组件的 HMR,提供开箱即用体验。
- Elm Hot webpack Loader: 支持 Elm 编程语言的 HMR。
- Angular HMR: 没有必要使用 loader!直接修改 NgModule 主文件就够了
修改配置
// 4.0 开启热更新
devServer: {
    contentBase: resolve(__dirname, 'dist'),
    // 开启HMR功能
    // 当修改了webpack配置,新配置要想生效,必须重新webpack服务
    hot: true,
    compress: true,
    port: 3000,
    open: true,
  }
source-map
source-map: 一种 提供源代码到构建后代码映射 技术 (如果构建后代码出错了,通过映射可以追踪源代码错误)

    [inline-|hidden-|eval-][nosources-][cheap-[module-]]source-map

    source-map:外部
      错误代码准确信息 和 源代码的错误位置
    inline-source-map:内联
      只生成一个内联source-map
      错误代码准确信息 和 源代码的错误位置
    hidden-source-map:外部
      错误代码错误原因,但是没有错误位置
      不能追踪源代码错误,只能提示到构建后代码的错误位置
    eval-source-map:内联
      每一个文件都生成对应的source-map,都在eval
      错误代码准确信息 和 源代码的错误位置
    nosources-source-map:外部
      错误代码准确信息, 但是没有任何源代码信息
    cheap-source-map:外部
      错误代码准确信息 和 源代码的错误位置
      只能精确的行
    cheap-module-source-map:外部
      错误代码准确信息 和 源代码的错误位置
      module会将loader的source map加入

    内联 和 外部的区别:1. 外部生成了文件,内联没有 2. 内联构建速度更快

    开发环境:速度快,调试更友好
      速度快(eval>inline>cheap>...)
        eval-cheap-souce-map
        eval-source-map
      调试更友好
        souce-map
        cheap-module-souce-map
        cheap-souce-map

      --> eval-source-map  / eval-cheap-module-souce-map

    生产环境:源代码要不要隐藏? 调试要不要更友好
      内联会让代码体积变大,所以在生产环境不用内联
      nosources-source-map 全部隐藏
      hidden-source-map 只隐藏源代码,会提示构建后代码错误信息

      --> source-map / cheap-module-souce-map
修改配置
// 开发环境
devtool: "eval-source-map";
// 生产环境
devtool: "source-map"; // 根据需求进行选择
oneOf
oneOf:让一个文件只有一个 loader 处理 ,找打对应的 loader 就不往下遍历了。
修改配置
  module: {
    rules: [
      {
  // 需要每个类型的文件都处理的loader 单独在oneOf外面
      },
      {
        //  oneOf 内部 一个 rule 只处理一个类型 找到对应类型的 rule 就不再继续往下遍历
        oneOf: [
          {
            test: /\.css$/,
            use: styleCommonLodar
          },
        ...
        ]
      }
    ]
  },
优化效果
#优化前
webpack 5.22.0 compiled with 1 warning in 12820 ms
#优化后
webpack 5.22.0 compiled with 1 warning in 9615 ms
babel 缓存
缓存文件会放在 node_modules\.cache\babel-loader中,如果编译的不对删除这个文件再试
修改配置
  {
    test: /\.js$/,
    exclude: /node_modules/,
    loader: "babel-loader",
    options: {
      // 开启babel缓存
      // 第二次构建时,会读取之前的缓存
      // 缓存文件会放在 node_modules\.cache\babel-loader中  如果编译的不对删除这个文件再试
      cacheDirectory: true,
      rootMode: "upward" // 需要配置 rootMode: "upward" 意思是向上查找 找到 babel.config.[json | js]
    }
  },
优化效果
#优化前
webpack 5.22.0 compiled with 1 warning in 11641 ms
#优化后 再次打包
webpack 5.22.0 compiled with 1 warning in 8476 ms
tree shaking 树摇
tree shaking:去除无用代码
前提
必须使用 ES6 模块化
开启 production 环境
作用
减少代码体积
修改配置
//webpack.config.js
mode: "production";
sideEffects
在 package.json 中配置 sideEffects :副作用 (导入了例如 css less 等样式 ,代码上是没用到的 ,但是需要保留的 )
// package.json
"sideEffects": false
//所有代码都没有副作用(都可以进行tree shaking) 问题:可能会把css / @babel/polyfill (副作用)文件干掉
"sideEffects": ["*.css", "*.less","*iconfont.js" ] //当需要保留的文件名放到数组中
官方结论
因此,我们学到为了利用 tree shaking 的优势, 你必须...
- 使用 ES2015 模块语法(即
import和export)。 - 确保没有编译器将您的 ES2015 模块语法转换为 CommonJS 的(顺带一提,这是现在常用的 @babel/preset-env 的默认行为,详细信息请参阅文档)。
- 在项目的
package.json文件中,添加"sideEffects"属性。 - 使用
mode为"production"的配置项以启用更多优化项,包括压缩代码与 tree shaking。
你可以将应用程序想象成一棵树。绿色表示实际用到的 source code(源码) 和 library(库),是树上活的树叶。灰色表示未引用代码,是秋天树上枯萎的树叶。为了除去死去的树叶,你必须摇动这棵树,使它们落下。
code split 代码分割
修改配置
  //webpack.config.js
  output: {
    // 这里使用 chunk name  +  contenthash 进行命名
    filename: 'js/[name].[contenthash:10].js',
    //..
  },
  optimization: {
    //...
    // 代码块 切割
    // 可以将node_modules中代码单独打包一个chunk最终输出 如果想分割node_modules中的代码需要配合dll
    // 项目的中业务代码通过 import() 语法进行分割
    splitChunks: {
      chunks: 'all',
    },
  },
修改业务代码
// 需要进行切割的js需要使用 import() 异步引入使用
// /* webpackChunkName: 'test01' */ test01 代表分割后 ChunkName, 比如以上配置会生成  test01.f20318151f.js
import(/* webpackChunkName: 'test01' */ "./test").then(({ mul, count }) => {
  console.log("Bowen: mul", mul);
});
PWA
下载插件
# 开启 service worker
npm install --save-dev workbox-webpack-plugin
# 生成清单文件 manifest.json
npm install --save-dev webpack-pwa-manifest
修改配置
// pwa
const WorkboxWebpackPlugin = require("workbox-webpack-plugin");
module.exports = {
  plugins: [
    // ...
    // 建议放到最下面  放到MiniCssExtractPlugin 会报错 Error: Cannot find module 'optimize-css-assets-webpack-plugin
    new WorkboxWebpackPlugin.GenerateSW({
      /*
        1. 帮助serviceworker快速启动
        2. 删除旧的 serviceworker

        生成一个 serviceworker 配置文件~
      */
      clientsClaim: true,
      skipWaiting: true
    })
    // 生成清单文件 manifest.json  的目的是将Web应用程序安装到设备的主屏幕 谷歌上会提示下载图标
    // https://developer.mozilla.org/zh-CN/docs/Web/Manifest
    new WebpackPwaManifest({
      name: 'My Progressive Web App',
      short_name: 'MyPWA',
      description: 'My awesome Progressive Web App!',
      background_color: '#ffffff',
      crossorigin: 'use-credentials', //can be null, use-credentials or anonymous
      icons: [
        {
          src: resolve('src/assets/icon.png'),
          sizes: [96, 128, 192, 256, 384, 512], // multiple sizes
        },
        {
          src: resolve('src/assets/icon.png'),
          size: '1024x1024', // you can also use the specifications pattern
        },
        {
          src: resolve('src/assets/icon.png'),
          size: '1024x1024',
          purpose: 'maskable',
        },
      ],
    }),
  ]
};
业务代码修改
// index.js
/*
  1. eslint不认识 window、navigator全局变量
    解决:需要修改package.json中eslintConfig配置
      "env": {
        "browser": true // 支持浏览器端全局变量
      }
   2. sw代码必须运行在服务器上
      --> nodejs
      -->
        npm i serve -g
        serve -s build 启动服务器,将build目录下所有资源作为静态资源暴露出去
*/
// 注册serviceWorker
// 处理兼容性问题
if ("serviceWorker" in navigator) {
  window.addEventListener("load", () => {
    navigator.serviceWorker
      .register("/service-worker.js")
      .then(() => {
        console.log("sw注册成功了~");
      })
      .catch(() => {
        console.log("sw注册失败了~");
      });
  });
}
多进程打包
官方文档:https://webpack.docschina.org/loaders/thread-loader/#root
下载依赖
npm install --save-dev thread-loader
修改配置
module.exports = {
  module: {
    rules: [
      {
        test: /\.js$/,
        include: path.resolve("src"),
        /*
          开启多进程打包
          进程启动大概为600ms,进程通信也有开销。
          只有工作消耗时间比较长,才需要多进程打包
        */
        use: [
          "thread-loader",
          // 耗时的 loader (例如 babel-loader)
        ],
      },
    ],
  },
};
externals 外部扩展 (排除无需打包的外部依赖)
官方文档:https://webpack.docschina.org/configuration/externals/ 防止将某些 import 的包(package)打包到 bundle 中,而是在运行时(runtime)再去从外部获取这些扩展依赖(external dependencies)。 例如,从 CDN 引入 react,而不是把它打包
修改 html 模板
<!-- index.html -->
<script
  crossorigin
  src="https://unpkg.com/react@17/umd/react.production.min.js"
></script>
<script
  crossorigin
  src="https://unpkg.com/react-dom@17/umd/react-dom.production.min.js"
></script>
修改配置
module.exports = {
  //...
  externals: {
    // 拒绝react被打包进来
    // key -> import react from "react" 中的 "react"
    // value -> react 的命名空间 namespace React
    react: "React",
    "react-dom": "ReactDOM",
  },
};
DllPlugin (打包优化)
官方文档:https://webpack.docschina.org/plugins/dll-plugin/ dll 主要用户用于将第三方依赖 或者公共依赖 进行打包, 目的与 externals 差不多都是为了加快构建速度
添加 webpack.dll.js
webpack.dll.js 专门用于打包第三方依赖 或者公共依赖
/**
 *    webpack.dll.js
 *   使用dll技术,对某些库(第三方库:jquery、react、vue...)进行单独打包
 *     当你运行 webpack 时,默认查找 webpack.config.js 配置文件
 *     需求:需要运行 webpack.dll.js 文件
 *       --> webpack --config webpack.dll.js
 *
 * @format
 */
// 清理上次的打包文件
const { CleanWebpackPlugin } = require("clean-webpack-plugin");
const { resolve } = require("path");
const webpack = require("webpack");

module.exports = {
  entry: {
    // 最终打包生成的 vendor --> MyDll.[name].js  name=vendor
    // ['react',''react-dom'] --> 要打包的库是react  跟包名一致react
    vendor: ["react", "react-dom"],
  },
  output: {
    // 生成文件名
    filename: "[name].dll.js",
    path: resolve(__dirname, "dll"),
    // 打包的库里面向外暴露出去的内容叫什么名字(全局变量名) 需要和 webpack.DllPlugin 中的 name 抱持一致
    library: "[name]_[fullhash]_library",
  },
  plugins: [
    new CleanWebpackPlugin(),
    // 打包生成一个 manifest.json --> 提供和react映射 manifest.json中映射library名称
    new webpack.DllPlugin({
      name: "[name]_[fullhash]_library", // 映射库的暴露的内容名称 不用管叫什么 打包后的代码会使用 咱们构建前的代码还是该怎么使就怎么使
      path: resolve(__dirname, "dll/manifest.json"), // 生成的清单文件 包含了react 和 react-dom
    }),
  ],
  mode: "production",
};
执行 npx webpack --config webpack.dll.js
会在当前目录下生成 dll 目录
dll
├── manifest.json // 清单
├── vendor.dll.js // 第三方包的集合
└── vendor.dll.js.LICENSE.txt
manifest.json
{
  "name": "vendor_311590c415821fbaedf4_library",
  "content": {
    "../node_modules/react/index.js": {
      "id": 378,
      "buildMeta": {
        "exportsType": "dynamic",
        "defaultObject": "redirect"
      },
      "exports": [
        "Children",
        "Component",
        "Fragment",
        "Profiler",
        "PureComponent",
        "StrictMode",
        "Suspense",
        "__SECRET_INTERNALS_DO_NOT_USE_OR_YOU_WILL_BE_FIRED",
        "cloneElement",
        "createContext",
        "createElement",
        "createFactory",
        "createRef",
        "forwardRef",
        "isValidElement",
        "lazy",
        "memo",
        "useCallback",
        "useContext",
        "useDebugValue",
        "useEffect",
        "useImperativeHandle",
        "useLayoutEffect",
        "useMemo",
        "useReducer",
        "useRef",
        "useState",
        "version"
      ]
    },
    "../node_modules/react-dom/index.js": {
      "id": 542,
      "buildMeta": {
        "exportsType": "dynamic",
        "defaultObject": "redirect"
      },
      "exports": [
        "__SECRET_INTERNALS_DO_NOT_USE_OR_YOU_WILL_BE_FIRED",
        "createPortal",
        "findDOMNode",
        "flushSync",
        "hydrate",
        "render",
        "unmountComponentAtNode",
        "unstable_batchedUpdates",
        "unstable_createPortal",
        "unstable_renderSubtreeIntoContainer",
        "version"
      ]
    }
  }
}
修改配置
webpack.config.js
const webpack = require("webpack");
// 自动在html中引入资源插件 (不用插件 手动在模板html中添加也可以)
const AddAssetHtmlWebpackPlugin = require("add-asset-html-webpack-plugin");
module.exports = {
  plugins: [
    // ...
    // 告诉webpack哪些库不参与打包
    new webpack.DllReferencePlugin({
      manifest: resolve(__dirname, "dll/manifest.json"),
    }),
    // 将某个文件打包输出去,并在html中自动引入该资源
    new AddAssetHtmlWebpackPlugin({
      filepath: resolve(__dirname, "dll/vendor.dll.js"),
    }),
  ],
};
打包生成的结构
dist
├── assets
├── css
├── index.html  // html中引入 vendor.dll.js <script defer="defer" src="./vendor.dll.js"></script>
├── js
├── vendor.dll.js // 将dll下的 vendor.dll.js  放到当前打包后的目录下
└── vendor.dll.js.LICENSE.txt
DLL 和 externals 、code split 的区别
DLL
- 用于将第三方依赖单独打包构建,跟项目一起放到同一个服务器下进行加载
- 优点:优化项目本地的构建速度
externals
- 不打包第三方依赖,第三方依赖使用 CDN
- 优点:优化项目本地的构建速度,因为使用 CDN 优化第三方依赖加载速度
code split
- 将项目中的进行模块代码分割成多个 js 文件
- 优点:优化项目本身加载速度,依靠代码分割可以实现模块的懒加载和预加载
官方文档
生产环境配置官方文档
https://webpack.docschina.org/guides/production/
css 压缩、提取
https://webpack.docschina.org/plugins/mini-css-extract-plugin/#minimizing-for-production
每次打包清除打包文件
const { CleanWebpackPlugin } = require('clean-webpack-plugin');
...
plugins:[
    new CleanWebpackPlugin(),
]
报错
Error: Automatic publicPath is not supported in this browser
设置 output 中 publicPath: '' 为空字符串
tip :项目中的基础知识
node 模块的搜索流程
node 在使用模块名来引入模块时,会首先在当前目录的 node_modules 中寻找是否有该模块 如果有则直接使用,如果没有则会一直向上一级目录的 node_modules 中寻找,直到磁盘的根目录
.browserslistrc
对应 package.json 中的 browserslist
postcss-preset-env 会找到 browserslist 作为兼容的基础
browserslist 配置 https://github.com/browserslist/browserslist
.eslintrc.js
对应 package.json 中的 eslintConfig
eslint 配置 https://eslint.org/docs/developer-guide/nodejs-api#%E2%97%86-new-eslint-options
babel.config.js
bable 的配置文件 对应 webpack.config.js 中 babel-loader 的 options
babel.config.js 文件,可以使用不同的扩展名(.js,.cjs,.mjs)
bable 的配置文件分为两种:
- babel.config.js 整个项目都用这个 babel 配置(项目范围的配置)
- .babelrc.js 配置文件是否仅适用于项目的某个部分 (相对文件配置)
具体配置:https://babeljs.io/docs/en/config-files
.prettierrc.js
vscode 中的 prettier 插件 会优先已这个文件作为格式化的配置
配置同 prettier 插件 https://prettier.io/docs/en/options.html
核心模块
postcss
css 兼容性插件
配合 webpack 使用 :postcss-loader https://www.npmjs.com/package/postcss-loader
eslint
语法检查校验插件
配合 webpack 使用 :eslint-webpack-plugin https://www.npmjs.com/package/eslint-webpack-plugin
babel
js 兼容性插件
配合 webpack 使用 : babel-loader https://www.npmjs.com/package/babel-loader